Mastering Atmospheric Smoke Effects in Photoshop
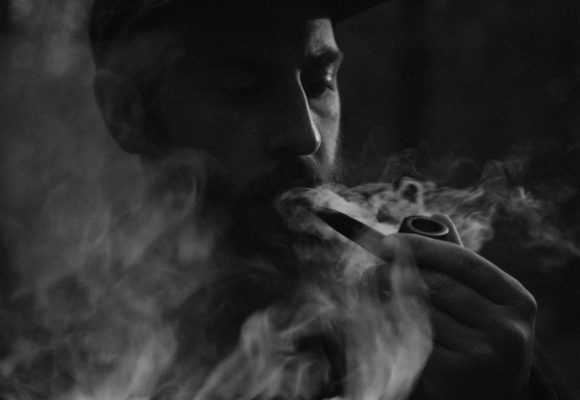
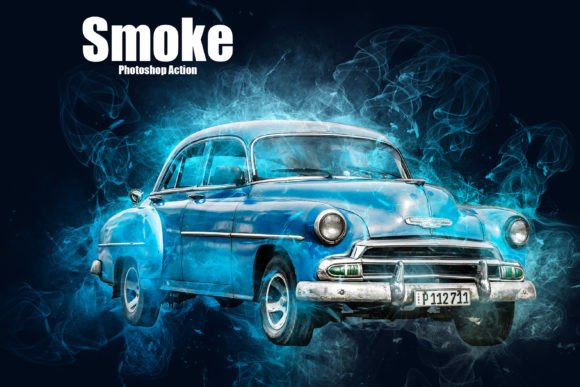
Creating realistic atmospheric effects from scratch is one of the most time-consuming tasks in digital design. Whether you are compositing a product shot for an e-commerce site or designing a moody poster for an upcoming event, getting the texture and flow of smoke right requires a deep understanding of lighting, opacity, and layer blending. This is where a specialized Smoke Photoshop Action becomes an invaluable asset in your creative toolkit. Rather than spending hours painting wisps by hand or searching through endless stock photo libraries for the perfect plume, this tool allows you to generate complex, high-quality smoke textures with a single click.
The appeal of this specific action lies in its balance between automation and control. It does not just slap a generic overlay on your image; it builds the effect using non-destructive methods. This means every element remains editable, allowing you to tweak the intensity, color, and position to match your specific vision. For designers who value efficiency without sacrificing quality, this workflow enhancement is a game-changer.
Understanding the Workflow and Technical Features
To get the most out of this tool, it is essential to understand what is included in the package and how it integrates into your existing workflow. The download includes one ATN file, which is the core action script, and one ABR file containing custom brushes. These brushes are crucial because they provide the raw material that the action uses to build the smoke layers. Additionally, a comprehensive help file is included to guide you through installation and troubleshooting, ensuring that even beginners can set it up quickly.
One of the standout features is the use of well-arranged layers. When you run the action, Photoshop does not flatten your image. Instead, it creates a structured group of layers that you can adjust individually. You might find layers for highlights, mid-tones, shadows, and color grading. This level of organization is vital for professional work, as it allows you to fine-tune the look. If the smoke feels too dense, you can lower the opacity of specific layers. If it needs to blend better with the background, you can adjust the blending modes or add a mask to erase unwanted areas.
Compatibility is another key consideration. This action is designed to work seamlessly in Photoshop versions CS4, CS5, CS6, and CC. However, it is important to note that it is optimized exclusively for the English version of Photoshop. Users with other language settings may encounter errors during execution, so ensuring your software language is set to English is a necessary pre-step. Furthermore, for the best visual fidelity, the developer recommends using source images with a resolution of 1500 pixels or higher. High-resolution inputs ensure that the smoke textures remain crisp and detailed, avoiding pixelation that can ruin the illusion of realism.
Elevating Brand Identity and Visual Storytelling
While we often associate typography terms like serif font, sans serif font, or script font with branding, visual textures play an equally critical role in brand identity. Smoke is a powerful visual metaphor. It can signify mystery, danger, elegance, or transformation. When used correctly in logo design or packaging design, it adds a layer of depth that flat colors cannot achieve. Imagine a perfume brand using subtle, swirling mist to evoke sensuality, or a tech company using sharp, digital-looking vapor to suggest innovation. The versatility of this action allows for both organic and stylized interpretations.
In editorial design and web design, atmospheric elements help establish mood before the user even reads a word. A hero image on a landing page featuring dramatic smoke can immediately capture attention and set the tone for the content below. This influences audience engagement by creating an emotional connection. Unlike a static background, dynamic smoke effects draw the eye and encourage viewers to linger longer on the page. For social media graphics, where competition for attention is fierce, a striking visual hook can significantly improve click-through rates and shares.
It is also worth considering how these effects interact with text. When placing headlines over smoky backgrounds, readability can become a challenge. The key is to maintain sufficient contrast. If the smoke is light, use dark text, and vice versa. You may need to adjust the opacity of the smoke layers behind the text to ensure the message remains clear. This balance between artistic flair and functional clarity is what separates amateur designs from professional modern typography layouts.
Practical Tips for Best Results
Using a Smoke Photoshop Action is straightforward, but achieving photorealistic results requires a bit of artistic intuition. Here are some practical recommendations to help you integrate this tool into your projects effectively:
- Start with High-Quality Base Images: As mentioned, use images that are at least 1500 pixels in their shortest dimension. Low-resolution images will result in blurry, unconvincing smoke.
- Match the Light Source: Pay attention to the lighting in your original photo. If the light comes from the left, ensure the smoke highlights align with that direction. You can manually adjust the brightness and contrast of the smoke layers to mimic the ambient light.
- Experiment with Color Grading: Smoke is rarely pure white or gray. It reflects the colors around it. Use adjustment layers like Curves or Color Balance to tint the smoke so it blends naturally with the environment. For example, sunset scenes benefit from warm orange and pink hues in the vapor.
- Use Masks for Precision: Do not be afraid to paint on layer masks. You might want the smoke to emerge from a specific object, like a chimney or a cup of coffee. Masking allows you to hide parts of the effect that overlap incorrectly, creating a more believable composite.
- Combine with Other Textures: For a richer look, consider combining the smoke action with other design assets like dust particles or lens flares. This adds complexity and realism to the scene.
When evaluating project fit, consider the narrative you are trying to tell. Is the smoke meant to be ominous or ethereal? The brush presets included in the ABR file offer different densities and shapes, allowing you to choose the right "personality" for the effect. For a commercial font or product advertisement, subtlety is often key. You want the product to remain the focal point, with the smoke serving as a supporting actor rather than the star.
Finally, always review your work at 100% zoom. Details that look good at a small scale may reveal artifacts or repetition when viewed closely. Since the layers are adjustable, you can easily refine these details before exporting. Whether you are a hobbyist looking to enhance personal photos or a professional designer working on a high-stakes creative font campaign, mastering this tool can significantly elevate the production value of your work. By focusing on non-destructive editing and thoughtful integration, you ensure that your designs remain flexible, professional, and visually compelling.